Folding and Cutting Paper
Katie Steckles
March 14th is considered a special day for mathematicians. Since the date, in an MM.DD date format, is written 3.14, it’s the day of the year that most closely approximates the value of π (unless you’re prepared to use the DD/MM format in which case 22/7 is a closer match). It’s recently gained added significance, since 2019 when it was declared by UNESCO to also be the International Day of Mathematics.
For this year’s event, I’ve been invited to speak as part of one of the IDM’s many events – part of their Global Online Celebration live stream. With sessions taking place in five different languages and at different times throughout the day, the event will consist of a series of short talks for a general audience, on a variety of topics within mathematics – and how it unites us. The talks will be streamed live and free to watch.
For my section, I’ve chosen to talk about the Fold and Cut Theorem – one of my favourite mathematical results, and something that I’ve found unites people whenever I talk about it. It’s a simple idea that anyone can understand, and often immediately provokes some people to investigate, play and try to solve a puzzle for themselves – while others are merely happy to be impressed by such an elegant result.
Cutting to the chase
The theorem says simply that for any shape drawn on a piece of paper, as long as the edges of the shape are all straight lines, a pattern of folds can be found that will mean if you fold up the paper and make one straight cut across it, the result will be that the original shape has been cut out exactly. There won’t be a cut in from the side of the paper to start cutting around the shape – the cut you’ve made will land exactly on the edges of the shape, leaving the shape and its border completely intact.
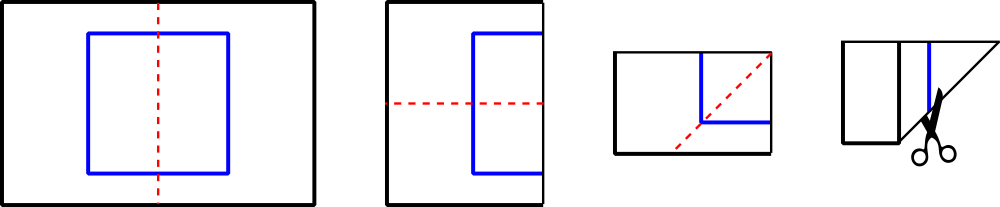
For some simple shapes, it’s maybe possible to visualise how this works. If I wanted to cut out a simple square, I could fold the paper in half – lining up the edges of the square exactly by looking through the paper at a light source, then fold it again the other way, then make a diagonal fold to reduce to a single line that needs cutting. This can also be achieved more simply by making two diagonal folds, leaving a longer straight line to cut.
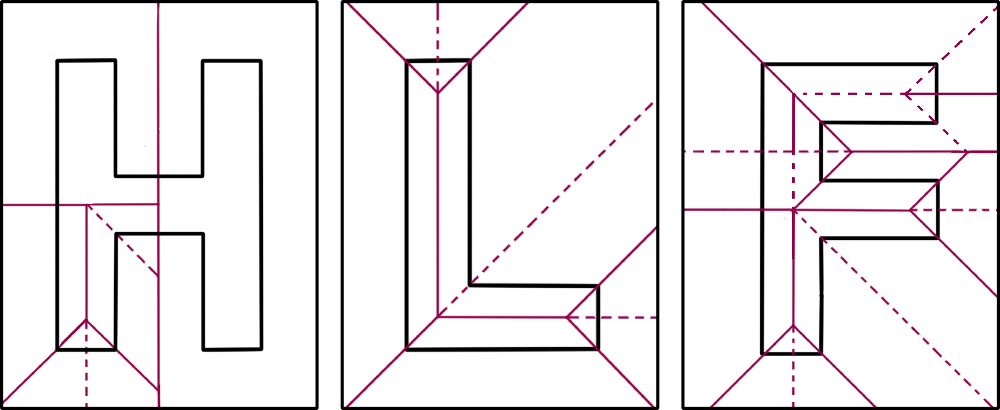
As shapes get more complicated, so do the pattern of folds needed. A nice example I’ve found is the letters of the alphabet – some, like I, L or C can be completed using a few simple folds; others, like T or K, take a little more thought; and some, like R and S (or at least, a version of those letters drawn with straight lines) have no nice lines of symmetry to take advantage of, and require a bit more thinking. But the beauty of the theorem is that I know whatever shape I try to cut out, I know there will be a fold pattern that works.
The proof is in the folding
You might wonder how it’s possible to prove a theorem like this. It’s a nice example of a statement that can be proved constructively: if you give me a shape, I can provide you with a set of instructions that will produce a set of folds that allow you to cut out that shape with one cut. Hence, the theorem holds – any shape you give me, no matter how complex, can be folded and cut, and hence it must hold in generality.
The proof was first published in 1998 by mathematicians Erik Demaine, Martin Demaine, and Anna Lubiw, who presented an algorithm for finding a fold pattern they called the Straight Skeleton method. The idea is that you can take the shape you want to cut, and shrink it – keeping the edges parallel to their original positions, but reducing their length as needed until the edges are shrunk to a single point. Following the paths the corners of the shape take produces the ‘skeleton’ of the shape – lines which bisect the angles at the corners, and meet at points in the middle of the shape.

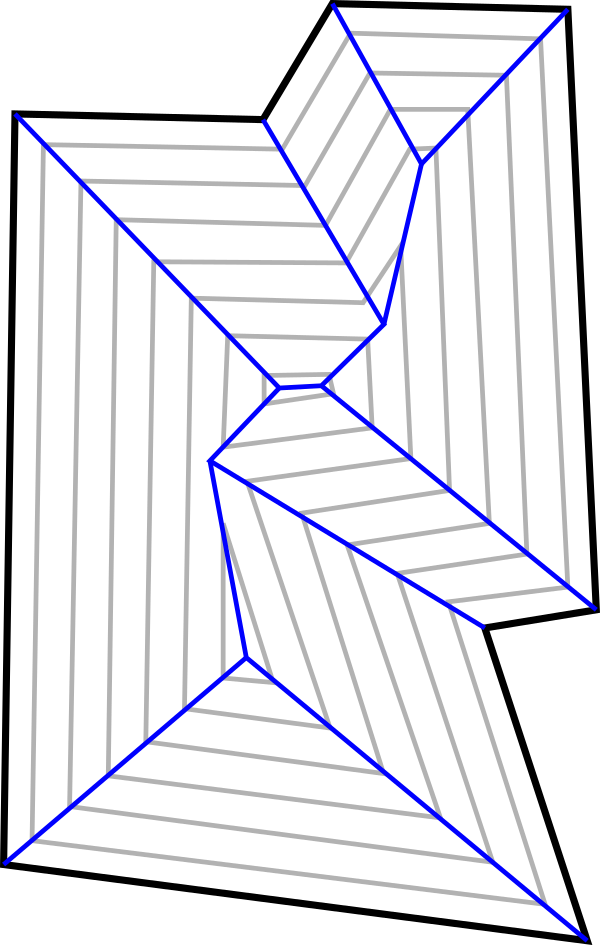
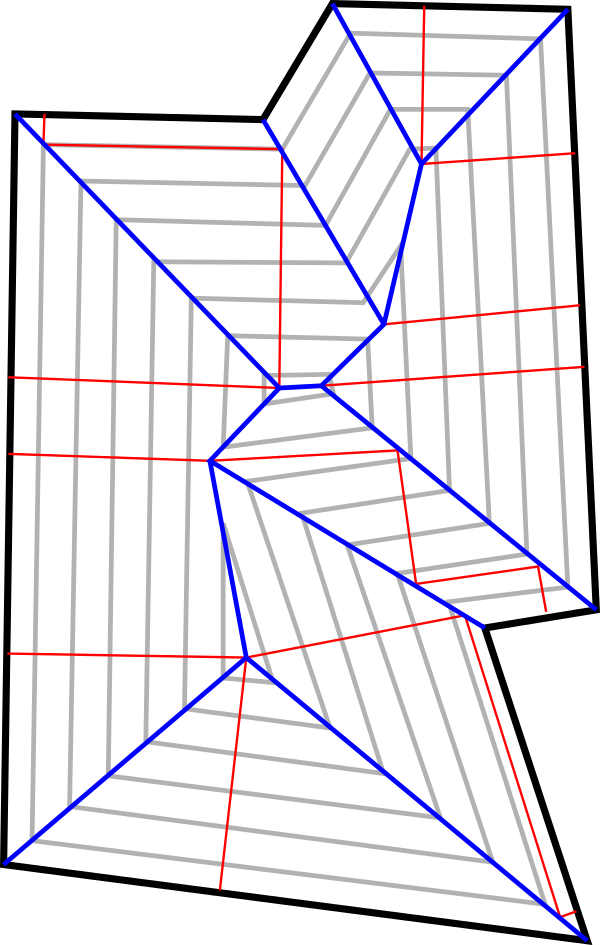
Having obtained this skeleton, lines can be drawn from the vertices of the skeleton – points where those lines meet, going out perpendicular to the edges of the original shape. If these lines meet the skeleton elsewhere, they are reflected (at the same angle they came in) and continue until they hit the edge of the shape at right angles. Along with the lines of the original skeleton, some subset of these new perpendicular lines combine to give the fold pattern.
The tricky part of the proof is showing that such a fold pattern is possible in origami, and will give a flat shape when all the folds are made in the right directions. It might be that the algorithm generates a pattern of folds that isn’t physically possible using a real piece of paper! The proof deals with this, essentially by breaking it down into cases and considering the possible arrangements of shapes and corners you might encounter.
Doing so meant that Demaine et al had proven it was possible to cut out any closed shape – not just simple ones, but of arbitrary complexity, including shapes with more than one piece to them, and with holes in the middle – using one straight cut.
Other methods
Since the original paper, Erik Demaine worked with Marshall Bern, David Eppstein and Barry Hayes to produce a second method, called the Disc-Packing Method, which can also be used to produce a fold pattern for any given shape. Roughly, the method involves placing a circle centred at each corner of the shape to be cut out, and letting them increase in size until the circles touch somewhere along the edge of the shape between those two corners.
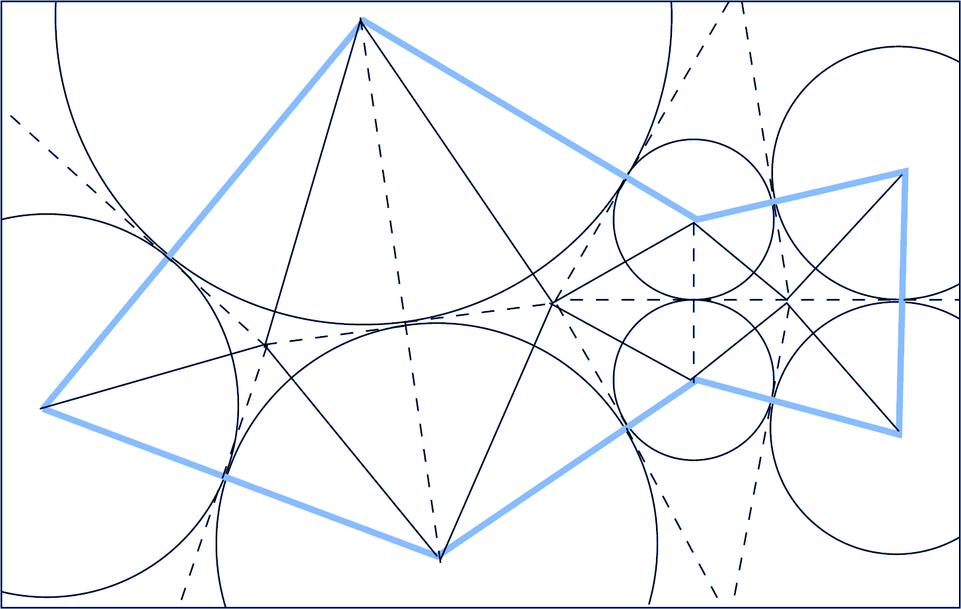
The regions between the circles must all have three or four sides, and the edges of the shape must be fully covered by circles everywhere. Now, if lines are drawn between the centres of the circles that are touching (including ones not on the same edge of the original shape), these lines can be used to form a fold pattern. For any given shape, there will be multiple ways to position and order the folds to obtain a one-cut folding – but the theorem holds as long as one exists for every shape.
I’ve been talking about this theorem for several years now – at live shows, comedy gigs, on YouTube, and even on a podcast – and enjoy doing demonstrations and sharing the puzzle of ‘how can I cut out this shape’.
If you watch my talk next Monday as part of the Online Global Celebration, you’ll be able to see me talk about this theorem and demonstrate some of my favourite single-cut folds. I’ve spent a while working out my own fold patterns for a range of shapes, which I can perform live, including letters of the alphabet and a five-pointed star.

The algorithmic methods for generating fold patterns, while they form the basis of the proof of the theorem, can result in fold patterns that are far too complex to actually use – there’s a limit on how many folds you can make in one piece of paper! But it’s often possible, certainly for simpler shapes, to work it out by hand – and it’s a fun way to share and demonstrate this theorem. The Fold and Cut theorem is a great example of a question that’s easy to understand, but difficult to solve – but mathematics can provide a neat answer.
The post Folding and Cutting Paper originally appeared on the HLFF SciLogs blog.